Further design considerations
The impact of sintering on dimensional tolerances
Other details in the MIM product emerge from the physics of the process. For example, sintering involves heating the powder body to a point where there is little strength.
The material strength is often in the MPa range during sintering densification. At this temperature, gravity is a significant force. Accordingly, distortion due to non-uniform heating and gravity impact the final size and shape. Sintered tolerances are often quite tight prior to sintering, but more scattered after sintering.
Depending on the equipment and technology used the as-sintered dimensional tolerances are ± 0.3% and in some cases ± 2% or ±0.1%. Much dispute emerges over the tolerance issue, but in a few cases ± 0.02% has been demonstrated using sorted parts, but at a cost since there is only 80% process yield.
The advantages of PIM
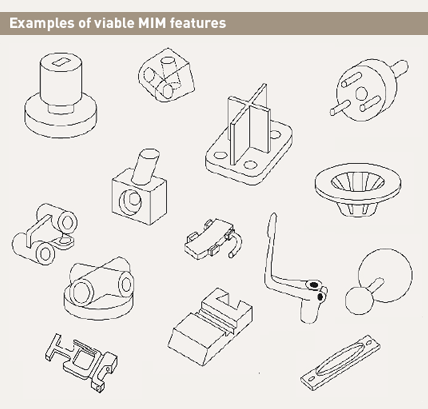
To appreciate the inherent advantages of MIM, Fig. 9 shows sketches of some of the possible geometries and feature combinations encountered already with the technology. This collection is only illustrative of the possibilities.
Table 1 shows typical variations observed in MIM component production, illustrating what can realistically be expected from the technology.
Since the small powders used in MIM can be costly, good candidates for MIM tend to have high machining costs when compared to the material cost. And even for high volume materials, such as surgical stainless steel, the raw powder cost is probably twice that of the cast material. For this reason, MIM is not cost competitive with respect to castings, but can be competitive if there is considerable machining on the casting.
| Feature | Best possible ± | Best possible ± |
|---|---|---|
| Angle | 0.1° | 2° |
| Density | 0.2% | 1% |
| Weight | 0.1% | 0.4% |
| Dimension | 0.05% | 0.3% |
| Absolute dimension | 0.04 mm | 0.1 mm |
| Hole diameter | 0.04% | 0.1% |
| Hole location | 0.1% | 0.3% |
| Flatness | 0.1% | 0.2% |
| Parallelism | 0.2% | 0.3% |
| Roundness | 0.3% | 0.3% |
| Perpendicularity | 0.1% or 0.1° | 0.2% or 0.3° |
| Average surface roughness | 0.4 µm | 0.8 µm |
Table 1 Typical variations observed in MIM component production (these are relative to the specified feature and the actual values encountered in production depend on many site-specific and component-specific factors)
Continue to next page: MIM material options and component properties
Download PIM International magazine
