Hybrid PM-MIM process produces ultra-micro gears
April 19, 2013
Hitachi Powdered Metals, part of Hitachi Chemicals Ltd, located in Matsudo-shi, Chiba, Japan, sees considerable potential for Powder Metallurgy (PM) in the manufacture of micro and ultra-micro PM parts for multifunctional home appliances and advanced medical equipment.
However, until now PM processing of such parts has not been possible because of restrictions in the use of ultrafine metal powders in conventional powder compaction. The filling of such ultrafine powders into complex dies by gravity would be difficult due to a number of factors resulting in inhomogeneous pressure distribution during forming and the resulting density variations within the green compacts. To overcome these problems the company has developed a new ‘flow forming’ process which uses the same feedstock as used in Metal Injection Moulding (MIM).
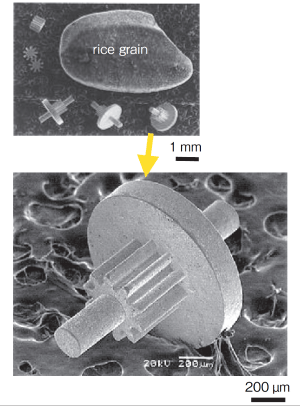
Fig. 1 Sintered micro gears produced under optimum flow forming conditions with grains of rice shown for comparison
A paper presented by Narutoshi Murasugi and Zenzo Ishijima at the PM2012 World Congress in Yokohama last October described the new flow forming process which the authors stated had been successfully used to produce sintered micro cup-shaped components having a wall thickness of just 0.05 mm, a record for PM, and also sintered micro gears with 10 teeth that are smaller than a grain of rice (Fig. 1). Murasugi stated that the feedstock for the new process was produced by mixing a polyacetal resin (POM) and paraffin wax (PW) binder with SUS440C stainless steel powder, having a mean particle size of 2 µm, in a dual axis kneader. The kneaded feedstock is supplied to the compacting die cavity using a specially developed cylindrical discharge device similar to a plunger in a MIM moulding machine. This ensures accurate weighing of the feedstock material into the die. The feedstock is heated to 433 K and a relatively low pressing force (<9N) is applied using a servomechanism at a punch stroke speed of 0.05 mm/s. The process can also produce two-stepped gears with a complex axis.
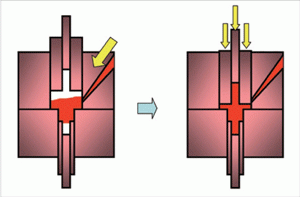
Fig. 2 Die structure and forming process using MIM feedstock
Debinding of the formed parts was done at 773 K x 7.2 ks, followed by sintering of the debound stainless steel parts at 1373 K x 3.6 ks in a dissociated ammonia atmosphere. The sintered parts were said to reach a relative density of 95% with a grain size of less than 5 µm. It was found that the parts could be sinter hardened to achieve a hardness of 680 – 730 HV.
Dimensional accuracy of the sintered micro gears was measured using a laser probe non-contact 3D measuring instrument, and the authors reported that the single pitch and total accumulative pitch error of the sintered micro gears was less than 2 µm. Total profile error was less than 8 µm, radial run-out less than 7 µm, coaxiality of the gear and shaft is less than 7 µm, and surface roughness less than Ra 0.31 µm. Improvement of the machining accuracy of the forming die is expected to lead to a better tooth profile and tooth run-out.


